

Struggling to set the perfect fan curve for your GPU? If so, you’re not alone. In this guide, we’ll outline every step you need to take in order to get the most out of your GPU, ensuring you can keep it running at peak performance.
Get ready to optimize and cool your system like a pro!
The fan curve on your GPU plays a crucial role in how well it performs, and how much noise it makes. It helps regulate the internal temperatures of the GPU so as to keep it cool and running at its best. The fan curve also governs how loudly or peacefully your GPU will operate while it is in use. Setting the perfect fan curve for your GPU can take some trial and error, but with a few simple steps, you can find the perfect balance between efficiency and noise level that works for you. In this guide, we’ll take you step-by-step through each setting to help you get the most out of your graphics card.

Explanation of fan curve and its importance
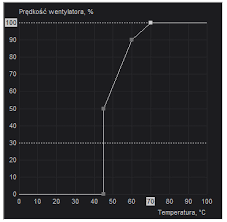
A GPU fan curve is the graph that represents the rotations per minute (RPM) of the GPU’s cooling fans as a function of their GPU temperature. Fan curves are used to keep your GPU operating within a safe and comfortable temperature range by increasing or reducing fan speed when temperatures reach certain points.
Selecting the proper fan curve for your graphic card is important because it can both maximize GPU performance and minimize noise levels. If you set the fan curves too low, your system may not be able to cool its internal components efficiently enough and could overheat, resulting in subpar gaming performance, frame drops, and sometimes even permanent damage to the internal hardware. On the other hand, if you set it too high, you will force your graphics card to run its fans at maximum speed even when it’s operating at a low temperature, thus generating more noise than necessary. The right fan curve should make sure that temperatures remain in check without sacrificing noise levels or performance.
Importance of setting a perfect fan curve for GPU
Setting the perfect fan curve for your Graphics Processing Unit (GPU) is important for achieving stable gaming performance. By effectively controlling the temperature of your GPU, you are able to prevent system breakdowns and other malfunctions. A fan curve also helps to decrease unnecessary noise from your computer’s cooling system and extend its life.
Several parameters must be considered when setting up a perfect fan curve for your GPU. These include:
- GPU Usage- The rate at which the graphics card is being used should be taken into account when deciding how quickly and efficiently it needs to cool down. A higher usage makes it necessary to have a faster-spinning fan so that more heat can be dissipated quickly.
- Temperature- Keeping track of the temperature inside the case is essential as well as within components like CPU and GPUs, to decide how fast a fan curve should be set up in order to maintain an adequate temperature level within safe limits.
- Case Type- Different case types require different types of fans depending on their positioning such as vertical or horizontal; thus, this type of layout should be taken into account before adjusting a suitable air flow.
Setting the right fan curves helps optimize performance while keeping temperatures and noise levels manageable, allowing users to enjoy gaming with minimal disruption from technical difficulties associated with overheating components or inefficient cooling solutions. Despite its importance, many gamers neglect this key step in optimizing gaming hardware – by dedicating some time towards tuning fans curves user can make sure that hardware lasts longer and performs better overtime.
Setting the Perfect Fan Curve for Your GPU
A fan curve is the way your GPU fan will adjust its speed depending on how hot it’s getting. This is incredibly important if you want to avoid any overheating or thermal throttling of your GPU. Setting a fan curve can help the GPU stay cool when it’s placed among other components with heat building up, such as CPU or PSU.
To set the perfect fan curve for your GPU, it’s important to understand the details of how temperature affects performance and what kind of temperatures you want to reach in order to keep your system running smoothly. Generally, most GPUs are cooled with a powerful but relatively silent blower-style cooler that pushes air out of their casing instead of drawing it in from outside sources. This usually generates a certain amount of noise that can be reduced by using an alternative cooling solution like an open-air setup or a liquid cooling loop.
When setting up a fan curve, there are some basic settings you’ll need to consider such as temperature target, start speed and maximum speed. These settings can range greatly depending on the make and model of your GPU as well as the components surrounding it and the passive cooling options available to you. As such, understanding how these settings interact and impact each other is key to establishing an optimal fan performance profile for your system.
The temperature target will determine when the fans will turn on and scale upwards; set this just below where thermal throttling begins for your card type/cooling setup combination – overheating issues should no longer be a problem! The start speed is simply which percentage your fans should begin at when internal components become too hot and both minimum speed (the lowest threshold where no further noise will be generated) and maximum speed (the highest level allowing for good performance) should also be considered depending on preference – jumping from minimum to maximum often causes an audible change though can heavily reduce temperatures if desired! Based off these parameters you’ll be able establish a steady curve that suits both performance & comfort needs giving yourself reliable cooling before any thermal issues arise!
Step 1: Install and launch the preferred tool
The first step in setting the perfect fan curve for your GPU is to install and launch the preferred tool. This can be done by downloading and installing a program such as MSI Afterburner or any other fan speed controlling software from the internet.
Once you have installed the software, run it and it should automatically detect and display your graphics card information in its main window. Different software may have slightly different interface layouts but most will display important information about your GPU, including temperature, fan speed, and load percentage graphs.
You can then adjust the fan curve on your GPU to get better performance out of it.
Step 2: Increase fan speed in small increments
It is important to increase the fan speed in small increments as a rapid change can override adjustments made earlier. Adjusting the fan speed too quickly can have a drastic effect on performance, therefore it is best to make small changes in order to find the ideal fan curve that best suits your GPU.
Start by raising the fan speed by 10 percent and run 3Dmark or another graphics application that has can stress test your graphics card to its limits. We recommend running an application such as Unigine Heaven Benchmark with powerful settings that will push your card to its limits.
If you notice that during the course of your benchmark, the temperature of your GPU increases beyond a certain threshold then you should raise the fan speed even higher until you find the sweet spot above this increase of temperature where it plateaus and stabilizes. You may need to repeat this process multiple times before achieving an optimal result but once found, this combination should ensure stable temperatures and allow for maximum performance from your GPU without excessive noise output from its fans.
Tools Required for Setting Fan Curve
Setting up a fan curve requires having the right tools to do the job. You will need to use some form of software such as MSI Afterburner or EVGA Precision XOC in order to be able to adjust your fan settings. Additionally you may need additional hardware such as thermistors or other temperature sensors in order to measure your GPU temperatures and make sure that your fan curve is set correctly. There are also online tools available for setting up a custom fan curve, but those should only be used if you trust their source.
MSI Afterburner is the most popular software for GPU users, but if you are using a different company’s hardware then you can use their version instead such as EVGA Precision XOC. Both Afterburner and Precision XOC provide very similar controls when it comes to adjusting the fan speeds and setting custom curves, so they can usually be used interchangeably with little difference between them.
To control the fans you will need some form of software that can access the power and voltage readings from your GPU (and sometimes additional hardware if monitoring temperatures) which then interprets those readings into actionable commands that thing can send directly to the fans themselves (or more likely, through supported motherboards connected directly via motherboard headers). Once everything is setup and running properly, using either MSI Afterburner or EVGA Precision XOC along with any required additional hardware/software should enable you to start customizing your GPU’s fan curve accordingly.
MSI Afterburner
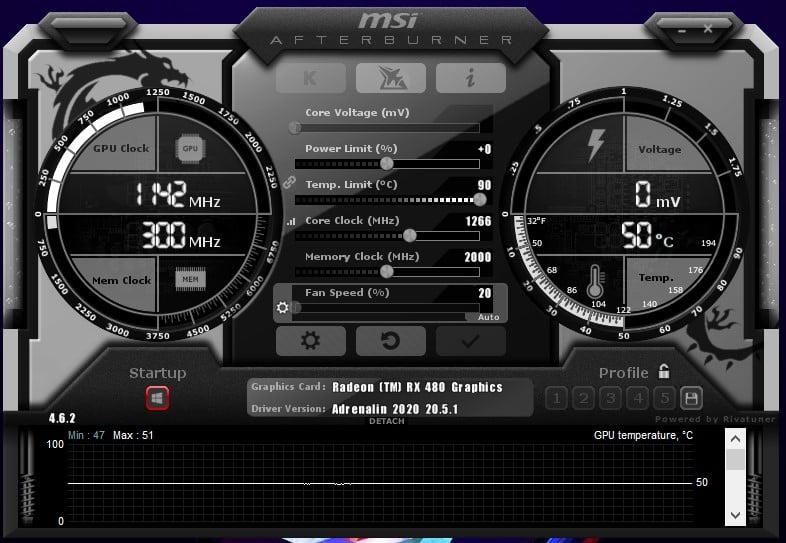
MSI Afterburner is a free overclocking utility that can help you control the fan speed of your GPU. The utility comes with a selection of pre-configured curves, or you can adjust individual sliders to create your own curve. With MSI Afterburner, you can set the fan curve to maintain quiet operation at low temperatures or ramp up the curve to keep your GPU cooler while gaming.
Here is a step-by-step guide on how to use it:
- Download and install MSI Afterburner from their official site.
- After installation, launch the program and click on Settings in the right corner at the bottom of the window.
- On the left panel, select ‘Fan’ and check ‘Enable user defined software automatic fan control’.
- Select ‘ON’ slider located in top right corner next to Fan Speed (%) label and then select ‘Curve’ tab next to it.
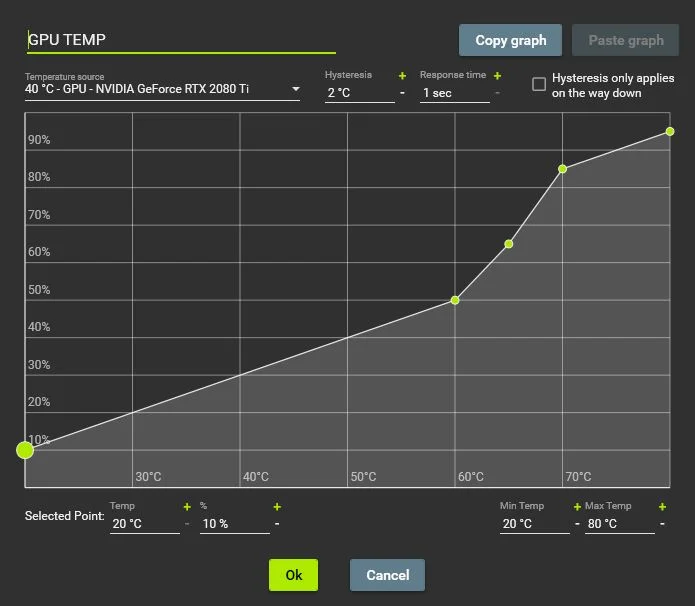
- Select one of predefined curves or you can adjust individual sliders manually by dragging them across the graph area according to your needs. The higher up they are, more aggressive fan curve will be applied while greater distance between sliders will create less aggressive curve with lower noise output but higher temperatures levels during full load scenarios when compared with aggressive setting above.
- Once you’re done selecting sliders for your fan curve click ‘OK’ to save changes (don’t forget this step).
- Your new custom Fan Curve should now be applied automatically after restarting MSI Afterburner (you won’t need to do this step manually).
GPU Tweak II
GPU Tweak II is an easy-to-use overclocking and fine-tuning tool which provides users with the capability to boost system performance while also providing stability testing and additional features such as fan speed control.
To set the perfect fan curve, users can select from four different modes: Manual Mode, Fixed Speed Mode, Target Temperature Mode and Target Fan Speed Mode. In each of these modes, users can manually adjust settings according to their preferences.
In Manual Mode, fans are adjusted manually for each temperature range that is set by the user. This makes it possible for the user to customize their settings according to their own needs. In Fixed Speed mode, the fan speed is constant and does not change regardless of the GPU temperature.
Target Temperature mode keeps GPU temperatures within a certain range while adjusting fan speeds accordingly in order to maintain a balanced level of cooling performance without creating unwanted noise. Lastly, in Target Fan Speed mode users can set a specific target fan speed which is applied regardless of its GPU temperature level or system load in order to provide a consistent cooling performance with reduced noise levels.
Tips for Maintaining a Perfect Fan Curve
It is important to note that maintaining an ideal fan curve does not guarantee the perfect cooling conditions for your GPU. To minimize heat output, one must also look into the case airflow and additional external cooling options. Besides checking temperature readings, it is also necessary to keep a close eye on the selection of fan configurations and settings.
Here are some tips for setting a perfect fan curve and keeping it on point:
- Keep monitoring your temperature readings regularly – After establishing a new fan curve, you should constantly monitor temperatures during heavy and/or light workloads to ensure that the temperatures remain within an acceptable range. If unexpected spikes occur, then you may have to tweak the fan curve in order to maintain regular performance with optimal temperatures.
- Check air intakes – Checking air intakes of your GPU isn’t something that needs doing all too often, but inspecting them after extended periods of gaming can help you identify any cooler blockages or dust build-up that are negatively impacting performances. Dust buildup on radiators can quickly create ‘hot-spots’, reducing thermal dissipation efficiency significantly over time – so be sure keep up with regular maintenance when necessary.
- Check air exhausts – Similarly as with air intakes, checking exit points is also important when it comes to maintaining optimal thermals over extended periods of time. A messy exhaust setup can interfere with proper airflow in all directions leading down from your graphics card; so check all connected fans and be sure nothing is restricting their operations in any way before attempting modifications to fan curves or other additional cooling components like vapour chambers or heatsinks.
- Use automated fan control scripts where possible – This isn’t always possible as not all GPU BIOS/drivers offer this feature , but certain GPUs like NVIDIA provide AI controlled load balancing which works similarly as described above; adjusting clock speeds according to desired power targets while automatically adjusting fans to maintain thermals while under heavier loads (ie: heavy gaming sessions). This would require less manual adjusting than what’s available through most UI software applications and integrates nicely into most system performance monitoring tools.
Regularly clean the GPU and its fans
Keeping your GPU clean and free from dust is essential when setting the perfect fan curve. Allowing dust to accumulate on your GPU and its fans can cause issues with overheating as well as decreased performance due to the lack of airflow to cool the components. To get the most out of your fan curve, it’s important to regularly cleaning your GPU and its fans.
To begin, you’ll need a compressed air can or vacuum cleaner, soft cloths (microfiber if you have them), cotton swabs, rubbing alcohol, thermal paste and a lint-free cloth or cotton. Be sure to turn the PC off before beginning. Start by using the compressed air can or vacuum cleaner to remove any built-up dust from around your GPU and its fans. Make sure that you don’t touch any of the components as this may damage them or disrupt their current settings. Once you’ve removed all visible dust particles use a soft cloth and gently start wiping each component down until they are completely clean. Following this, apply an adequate amount of rubbing alcohol on a separate cloth or cotton swab and methodically start wiping each component until all debris has been removed (Remember: Alcohol may damage certain components like display ports – so be careful!). Finally use cotton swabs soaked in rubbing alcohol for cleaning any hard-to-reach areas such as fan blades or spaces between screws – just make sure no liquid gets inside any component / hole!
Once you have cleaned all necessary portions, dry off all components with another lint-free cloth/cotton pads before applying a new coat of thermal paste on top of both fans and the heat sink – this should improve overall cooling performance. And with that ,you’ve successfully cleaned your GPU for setting up that perfect fan curve!
Monitor the temperature and fan noise regularly
Monitoring your GPU temperature and fan noise regularly is an important part of ensuring that you maintain a safe, consistent fan curve for your graphics card. A good benchmark to keep in mind is that you don’t want your GPU to exceed 85°C under normal operating conditions. The ideal temperature range to aim for after setting up your fan curve should fall between 67-74°C depending on the specific card you are using.
Additionally, when monitoring the noise level, it is important to understand what is considered “normal” and what type of sound levels can alert you if something has gone wrong. Ambient noise from fans should not be more than 45db, a level that can still produce enough airflow and cooling to keep the temperature within the safe range mentioned earlier. If you are noticing higher sound levels than this, it could indicate issues with overclocking or settings changes that need to be adjusted before running for extended periods of time in order for your fan curve to provide optimal performance without any overheating risks.
Conclusion
Achieving the perfect fan curve for your GPU is important for overall system performance and can help you extract the best performance out of your hardware. The process involves choosing a primary temperature, determining the start speed, setting acceleration and maximum fan speed, ensuring that your GPU does not overheat and running tests to ensure stability.
Above all, it’s important to remember that every system has unique needs, inspired by specific cooling solutions or performance requirements. Finding the perfect fan curve isn’t an exact science – it’s an iterative process of experimentation and trial-and-error. Make sure to research the available options and test different settings to find a balance between power, temperature and noise that works best for you while taking into consideration any other limitations such as safety or budget concerns.
FAQs
How do I optimize my GPU fan curve?
To optimize your GPU fan curve, you can use software provided by your GPU manufacturer or third-party applications to adjust the fan speed based on your temperature settings. Start by monitoring your GPU temperature during usage and adjust the fan curve to maintain a balance between temperature and noise. A more aggressive fan curve will result in cooler temperatures but louder noise levels.
Should you set a fan curve GPU?
Yes, you should set a fan curve for your GPU as it helps to maintain optimal temperatures while balancing noise levels. Without a fan curve, the GPU may overheat and cause performance issues or damage to the hardware.
What should I set my GPU fan speed to?
The ideal fan speed for your GPU depends on your specific hardware, case airflow, and usage. It is recommended to set a fan speed that keeps the temperature below 80°C while being at a noise level that is tolerable for your setup.
Should I set GPU fan to 100%?
Setting the GPU fan speed to 100% is not recommended for long-term usage as it puts a strain on the fan and can result in increased noise levels. It is best to set the fan speed based on your temperature requirements and adjust the curve accordingly.
Is it okay to make GPU fan 100%?
It is not recommended to make the GPU fan speed 100% as it can cause increased noise levels and put a strain on the fan. It is best to set the fan speed based on your temperature requirements and adjust the curve accordingly.
What is optimal GPU fan curve?
The optimal GPU fan curve is one that balances temperature and noise levels based on your usage requirements. It is recommended to monitor the GPU temperature during usage and adjust the fan curve accordingly.
Is 70 fan speed bad for GPU?
A fan speed of 70% is not necessarily bad for the GPU, but it depends on the specific hardware and usage. It is recommended to monitor the temperature and noise levels to ensure a balance between the two.
How to maximize GPU performance?
To maximize GPU performance, you can ensure that your drivers are up to date, overclock the GPU, optimize your game settings, and maintain proper cooling. Additionally, you can close any unnecessary applications that may be running in the background.
What is a good GPU temp?
A good GPU temperature is below 80°C, but this may vary depending on the specific hardware and usage. It is recommended to monitor the temperature and adjust the fan curve accordingly.
How do I optimize my GPU for gaming?
To optimize your GPU for gaming, you can ensure that your drivers are up to date, optimize your game settings, overclock the GPU if possible, and maintain proper cooling. Additionally, you can close any unnecessary applications that may be running in the background.
See More
- Hello world!
- Best gpu for ryzen 9 3950x 2023
- Best 1080p 144Hz GPU 2023
- Best GPU for Ryzen 9 5900x 2023
- Best 3080 GPU 2023